Sunday 16 December 2012

Hanging Ornament


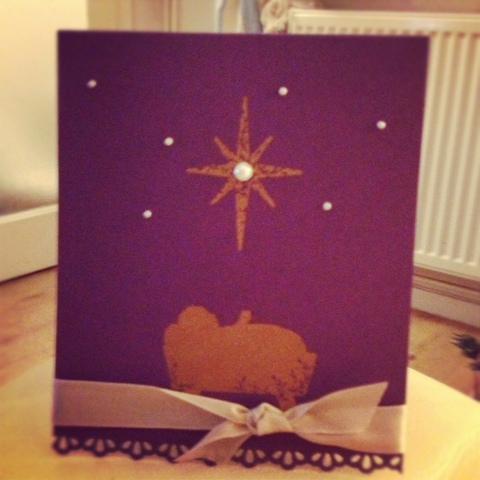
Here's a little something I've been working on in the evenings. My favourite Christmas colours are Gold Purple and Cream, Not very traditional I know but I just love that combination. I followed THIS tutorial on YouTube for the basic technique and changed it up a bit for what I wanted. All the bauble stamps were from the Ornaments Keepsakes stamp set and were cut out using the co-ordinating framelits. The Ink is Elegant Eggplant, I wanted a deep rich purple and this fit the bill perfectly. It did look VERY dark when I first stamped it - black almost but became much lighter as it dried (phew!) For the centres I cut out two large snowflakes and four medium snowflakes from the Snow Flurry Bigz Die, from Champagne Glimmer Paper. Those were topped with buttons from the New Vintage Buttons selection and then finished off with a few Basics Peals in various sizes. I linked the decorations using Bakers Twine and of course as almost everything needs ribbon and or a bow, I cracked open a Crumb Cake double whammy using both the Seam Binding Ribbon and Scalloped Tulle Ribbon. And Voile! A beautiful hand made decoration to hang on your wall. I made a few more of the middle decoration to hang on their own on the tree:) What's your favourite Christmas Colour Combination?


post signature

Wednesday 5 December 2012

Christmas is Coming!


Sorry about the picture...it's very dark outside! 
Last year, I very smugly, had all of my Christmas cards made by October, but this year life has been up dancing in my face distracting me and BAMB! December has appeared out of nowhere and I am completely unprepared for the season of goodwill! Last night my Dear One was out, I had 'Strictly' on Catch Up, and a faint glimmer of energy, so I grabbed the opportunity and and set a full scale production line in order to get my cards finished at last. I had an idea of how I wanted them to look so I made up a rough version and decided to just go for it. I'm determined to have them all handed out/ posted out by Sunday, as i hate having things hanging over me for too long.
 I adore the First Christmas Stamp set from the Christmas Catalogue, I wanted to keep the card simple to high light the beauty of the stamps, so I embossed the images in Gold Embossing Powder on an Elegant Eggplant Card-stock Base. I used the Finishing Touches Edgelit to decorate the base of the card and tied some Crumb Cake Seam Binding Ribbon to add a layer. The top looked a bit bare so I added some Basics Pearls and decided that it was done. Hurrah to have 1 thing ticked off my list of 1001 To-Do's before the 24th! 
New years resolution....Buy a better camera! Or I could just stop being lazy and taking pics on my phone :)

Sunday 18 November 2012

Designer Fabric Bunting Quilt.


I have wanted to get my hands on some of the new Designer Fabrics since I first saw the Spice Cake Fabrics in the Spring Catalogue. Next to paper crafts, sewing has been one of my longest and greatest passions. I love the colours and designs on the Stampin' Up! Designer Papers so to be able to get those same designs and colours in fabrics was an exciting proposition indeed and what better excuse then the impending arrival of a sweet little one to our family. My SIL isn't due to pop until late December but that is a busy time in anyone's life, let alone a Crafter who is usually flat out through the whole month of December, gluing, cutting, and sewing for all she's worth! So I got in early to avoid the rush and ordered myself 3 sets of Designer Fabric from the new Catalogue : Comfort Cafe, Summer Smooches, and Twitterpated. I cut them into 8" squares and sewed them all together, this left me with enough fabric to a couple of other projects and to cut out this for the back:
There are some really gorgeous bunting inspired quilts out there on the Internet at the moment and I thought this would be a lovely way to dress up the back of the quilt, using my Pennant Parade Bigz Die made cutting out all those flags a doddle:)


My SIL is a mad Disney fan so to make the bunting a little more special I (gulp) cut into my precious Munki Munki / Heather Ross Stash to add a few little characters, Alice in wonderland, Pinocchio, Snow white, they mixed in so beautifully with the other fabrics, I finished the quilt off with a Kona Solid in Grey (?) not sure which one, for the binding. The colours all work together so well for a gorgeous serene palette. I LOVE it, I hope it will keep the sweet little one it's intended for, warm, for years to come.

post signature

Sunday 4 November 2012

Delicate Doily Card.

The new Delicate Doily Die was just to beautiful to resist. I've not had the chance to delve into too many of its possibilities but I had to give it a test run as soon as it arrived. This is just a little 4"x4" card made out of Basic Black Card Stock, I cut the doily out if Whisper White and attached it to the card with a few very thin lines of Tombo glue. The bottom edge was cut using the Adorning Accents Edgelit, and then embossed with the coordinating embossing folder. The ribbon is a taffeta ribbon in Regal Rose and the finishing touch on the envelope was a simple black line of lace using the Viola's Lace Builder Wheel. Let me know what you think of it! I find it so hard to make very simple cards as I always want to add some 'fancy' but I quite like this just the way it is.

Monday 29 October 2012

A Quilt For My Sweet One.

A quick change of direction. I thought I'd share the quilt I made for Little Miss, I'm sure it will be the first of many, but this was supposed to be her first Christmas present. I finished it some time in June... 6 months later then planned, but hey! Life happens:) I made it almost entirely out of my treasured Heather Ross Far Far Away, cotton double gauze which is just the softest fabric you can imagine. The pattern, is a free download from the Amy Butler website which I have had sitting around for while, I just knew it would suit this fabric line. The fairy tale fabric is just so perfect for my little girl and my favourite part is the Princess and the Pea print that I used for the border. It took some fussy cutting but was so worth the extra time and effort.The borders and binding are in Kona Solid Cerise, I'd Ummmmd and Ahhhhhd about using just double gauze for the whole quilt and was going to do the borders in a purple flower print from the Far Far Away line but opted for the Kona as I felt it added some solidity to the delicate surrounding fabric. I took these pics while we were in Italy, such a beautiful inspiring location even with such a reluctant model. I wish I was still there!  I hope this quilt snuggles my little one and keeps her warm for years to come.
Yes the back is upside down but you get the idea :)

Sunday 28 October 2012

Pumpkin Treat

We don't really celebrate Halloween enough in our house, for me to justify getting a stamp set solely dedicated to the holiday, since the arrival of Little Miss however, I have felt the urge to celebrate it in some way. On our family night we take time to remember members of our family who have gone on ahead. Daddy did some pumpkin carving yesterday and whipped up some pumpkin pies. I roasted the pumpkin seeds in a little olive oil and sea salt for us to enjoy over the weekend, and made these Pumpkin Lollipop Holders for Little Miss to give any Trick or Treaters who might happen past the house on Wednesday.

     The holder was made using the scalloped tag on the Two Tags Bigz Die. The pumpkin is so simple to make, I just punched three Extra Large Ovals out of Pumpkin Pie Card stock (of course!) inked around the edges with some Soft Suede Ink, then stuck two of the ovals to the back of the other. The leaves are from the Bird Builder Punch. On the first pumpkin I traced and cut out a face from some Early Espresso Card stock but the thought of doing that for all of them quickly had me reaching for a pen! I finished it off with a small amount of Old Olive Taffeta Ribbon knotted around the bottom of the lollipop stick.

  I'm hoping to get a tutorial made up for the lollipop holder before December as I'm using the same design to make my advent calender this year, so keep tuned!

Thursday 25 October 2012

Little by Little.

I had seen divided page protectors for sale in a craft shop and had fancied trying them, so when I saw them make an appearance in the new Stampin' Up! Catalogue I had to order a set and give them a go. What appeals to me is that sometimes a whole 12" x 12" page can seem overwhelming, and a lot of space to fill all at once, with these you can work on a little section at a time, the whole page can link up or each section can have it's own little theme, trying out a new stamp set in one, some punch art in another, maybe a section dedicated to journaling and telling the story. While I don't think this page flows very fluently, I had a lot of fun making it, playing with each little rectangle. I can't wait to try my hands at the different combinations that are in the pack. 
 
You may also have noticed that the albums are now Ring Albums instead of Post Albums. This was a change that I was delighted about, while there seems to be more variety here in the UK when it comes to Post Albums, I prefer the Ring style because it makes accessing your pages so much easier. You just turn to the page you want and pop the rings open. The amount of time I have wasted trying to reorganise my pages or add one in, unscrewing the posts, pages slipping everywhere! If you haven't tried Ring Albums before, give these a try you will not be disappointed, they are excellent quality, really sturdy, and come in two sophisticated neutrals. I went for the Crumb Cake 12"x12" but am sure that an Early Espresso 8"x8" Album will be sneaking into my collection fairly soon.

Saturday 20 October 2012

Look At You GROW!

Since Little Miss was born I have taken literally thousands of pictures. The pile to be scrapped grows by the day and yet my free time is virtually non existent . Here I have tried to keep the layout really simple and it came together in around an hour. I love my new alphabet dies as they are going to save me a fortune in alphabet stickers as you can cut out only the letters you need and don't end up with loads of useless V's and Z's!

Monday 15 October 2012

10 Minutes and Counting!!!

It's my Dads Birthday today, I wasn't supposed to be seeing him until this afternoon so I thought I would have plenty of time to sit and make him a really special card. But, as is the way with this crazy thing we call life an early morning dash to the doctors with my Little Miss and quite a long wait once we got there meant that I was left with all but 10 minutes to create a master piece! And this is what I whipped up, inspired by a picture I saw here I hand drew the guitar body and winged it from there:) I love you Dad, I hope you had a lovely day!

Supplies: CardStock: Crumb Cake, Early Espresso, Basic Black, Soft Suede, Whisper White. Bakers Twine. Brads. First Edition Specialty DSP. Snail Adhesive, Sticky Strip.

Saturday 13 October 2012

A Most Excellent Workshop.


I had a delightful afternoon today spent stamping in the company of some lovely ladies at my first Christmas Workshop. We made 4 projects: and I started by walking them through how to make a very quick and simple but no less attractive, Christmas favour box. Next they tried their hands at the Sweet Pressed Cookie Stamp Set which I knew they would enjoy as much as I do. It  is such a great set for making impromptu gifts, or festive treats for a Halloween or Christmas party. Later we sat down to some card making. I showed them how to make two of the cards from the Autumn/Winter Catalogue.
We listened to carols and shared Christmas Stories and now I feel like I have made a good start on my card making, and can't wait to wade headlong into the ever growing list of projects that need to be completed by December.

Sunday 7 October 2012

Creative Elements Card.

   The Creative Elements Stamp Set is such a versatile set. The flourish stamp looks beautiful as a background stamp, and would dress up any scrapbook page, and of course that beautiful butterfly looks equally stunning in any number of colours and I've also seen it where the individual pieces have been coloured using the Stampin Right Markers which picks up the pattern on the wings so sweetly.
    On this card I have shaped the bottom edge using the Adorning Accents Edgelits Die, and did the same with a strip of Very Vanilla which I adhered to the bottom. I then punched a strip of Riding Hood Red with the Scallop Trim Border Punch and using some Sticky Strip I roughly pleated some Crochet Ribbon across the top. The embellishments were made using the Boho Blossoms punch, the Scallop Oval punch and the Labels Collection Framelits. Some Pearl Basic Jewels gave it a finishing touch.
    The Layout was a CASE from a card I saw on the SoShelli Blog. Her Card layouts are always so organic, and I love how unstructured and textured they are. Who do you enjoy drawing inspiration from? There are so many wonderful artists out there!

Thursday 4 October 2012

Tea Shoppe Treat

   I bought the Tea Shoppe stamp set simply because it was pretty, I didn't really know what I was going to do with it; I'm not a tea drinker, nor are my family and friends, but it was just SO pretty! However with the current trend for all things vintage and especially all the beautiful china tea sets being used to make anything from candles to cake stands, this set is bang on trend.

   Here I have whipped up a very quick card focusing on the main large tea cup stamp, I stamped this in Early Espresso onto a piece of Very Vanilla Card that I cut out using the Labels Collection Framelits.The background is Wisteria Wonder, as is the bakers twine. The finishing touches are a Pink Pirouette Beautiful Wings Embosslits Butterfly, and three of the smallest flower from the Boho Blossoms Punch in Wisteria Wonder, Island Indigo, and Riding Hood Red.

Tuesday 2 October 2012

Just For You Card.

I was so happy to see that one of my favourite paper sets from the Summer Mini Catalogue had made it into this years Catalogue. The beautiful Twitterpated DSP has such a lovely modern/vintage colour palette. I shaped the bottom part of the card using The Adorning Accents Edgelits, embossed the frame in Riding Hood Red using the Designer Frames Folder, then punched out a Very Vanilla Extra Large Oval, which I stamped with the flowers and sentiment from the Tea Shoppe Stamp Set. I aged the edges of the frame and the oval just by scraping the edge of my nail around the outside of the shapes. A few rolled roses, Baja Breeze Seam Binding Ribbon and leaves punched from the Builder Bird Punch finish it off.

Free Paper For SIX Months.

Yep you heard me right. If you sign up as a Stampin' Up! Demonstrator any time between now and the end of November you can enjoy a free pack of Designer Series Paper for the next SIX MONTHS! On top of the already generous benefits of being a demonstrator this offer really is the cherry on the top. Contact me TODAY to find out more about signing up. Which papers do you think you would like first!?

Monday 1 October 2012

The NEW 2012-2013 Stampin' Up! Catalogue!

Introducing the brand new 2012-2013 Stampin' Up! Catalogue! I have been so exitcited for this catalogue to launch it is full of so many fabulous new stamp sets, a set of 5 new In Colours, and so many new dies and accessories for the Big Shot that you won't know where to start first. I can't wait to share with you all the projects I have planned. This is going to be a GREAT year. There is also a tempting offer for everyone that signs up as a Demonstrator during October and November. Check back tomorrow and I will fill you in with all the details. But for now enjoy perusing the link to the new catalogue, and let me know which of the stamp sets you are most looking forward to trying!

You can order your very own catalogue from me today for just £4.50 you can have it delivered to your door so you can enjoy all the products and ideas in the comfort of your own home.
See here for details on how to order.

Saturday 29 September 2012

A New Punch Art Delivery


I love the naive cartoon like quality of punch art, and when I saw this sweet tutorial on Pinterest recently I couldn't resist giving it a go, and with the number of babies being born around me at the moment it doesn't hurt to have a few of these cards handy. Stampin' With Rachel has some lovely punch art tutorials on her blog, you really should check out her page yourself and see if any of the others take your fancy:) There's nothing better than people who are kind enough to share their secrets.

Materials 4x4" card: Very Vanilla Card stock, Marina Mist Card stock, Nursery Nest DSP, Marina Mist Ink, Creative Elements Stamp Set, Builder Bird Punch, Boho Blossoms Punch, Label Collections Framelits, Mini Daffodil Delight Brad.

Tuesday 25 September 2012

Going Going....Gone!

The launch date for the new Stampin' Up Catalogue is fast approaching, and sadly that also means we have to say goodbye to some of the wonderful Stampin' Up! products that we have loved from the past year. With so many changes happening with the introduction of this new catalogue the retiring products list is a great chance to get hold of any of these lovely bits before they're gone forever. As always I am more then happy to take your order if you would like to take the chance to buy some or all of these products at a reduced price. For the current list just click on the links below:
Retiring Stamps.
Retiring Accessories

Saturday 22 September 2012

Wishing you a Merry Christmas October Workshop.


Preparing for Christmas Workshop:£10.
Saturday 13th October  1.00-3.30pm ( 1 space left!)
Friday 19th October 7.30pm-10pm (4 spaces)
I will be walking you through 4 projects from the new Autumn/Winter Catalogue. 2 Christmas Cards, A gift box and a chance to play with the all new Sweet Pressed Cookies stamp set. The price includes all materials, your own copy of the Autumn/Winter Catalogue, and light refreshments.
To book your space contact me today. I look forward to seeing you there!

Announcing The New Autumn/Winter Catalogue

I almost forgot! Here is the NEW Autumn/Winter Catalogue. No longer a mini; this full size catalogue is packed to bursting with gorgeous products and ideas, to make your Halloween spookier, your Christmas, merrier and your Valentines day even more lovely. I guarantee you won't know where to start there are so many fabulous things inside. I want to make each and every one of the inspirational ideas inside, but where to start! If you want to have your very own copy email me today, for just 85p you can have your own copy delivered to your door in a few days.

Saturday 25 August 2012

Summer Sewing

My family and I are off on a holiday to Italy soon and my Little Miss has been in need of a few summery bits for her wardrobe. Every now and then I have to justify my ever growing hoard of fabrics by making a few things up to keep my husband happy so we had a dig around and picked out a few fabrics to make up some summer clothes. I adore the illustrations of the artist Heather Ross and happily for me she also prints these illustrations on fabric:))) These shorts were made from a pattern in Heather Ross's book Weekend Sewing; the Huck Finn Pants pattern. I shortened the length and added a turn up made from a pink polka dot quilting cotton, they came together really easily in just under an hour. They look so sweet on, there is something so precious about those chubby little knees peeping out from beneath big baggy shorts. Best of all I have a gorgeous model who was more then happy to pose for a few pictures wearing the new addition to her wardrobe, this is her new obsession, every five minutes shge wants to be lifted up onto the window ledge,  sometimes to watch the people walking by, sometimes trying to destroy the butterfly mobile I made for her, but most of all being sat snuggly wedged between all of her stuffed toys that have been carefully sat along the ledge just letting her legs dangle, and daring herself to make the leap back into her cot. She is such a dare devil. And a poser....I have no idea where she gets THAT from....!

Monday 9 July 2012

Biscuits

I think it was for my 14th birthday it may have been before, I've never been too good with the 'When' in my stories, but I do remember the 'Who' my sweet friend Debbie, turned up at my house with a delicious batch of freshly baked and iced gluten free biscuits for my birthday. I ate them all a little too quickly perhaps so had to get my hands on the recipe and she kindly obliged and it has been my go-to biscuit recipe ever since. I had a great group of friends growing up, they shared my love of all things crafty and baking and so Christmas and birthdays would be a riot of handmade delights. To me that has always been what a present is all about. Something that has taken time, love and thought to create. Anyone can buy a box of chocolates but to take your time to make and decorate those chocolates yourself, surely that's a gift worth giving, and one that I for one would always prefer to receive. My sister Emma had a birthday this week so deciding it was time for a change from all the cakies that I've been baking lately I thought I would try my hand at some iced biscuits. So I cracked open my trusty recipe; once she who wails was safely tucked up in bed, and baked and iced to my heart's content. For a first attempt they weren't too bad, I've learnt a few things and think I will definitely be doing this again, and the most impressive thing was that all but one ( someone had to check them for poison...;) made it to my sister, that was an achievement in itself as I usually take the 'one for me one for you' approach to baking!

Here's the recipe:)

Lemon gluten free biscuits:
4oz butter/ margarine
2oz sieved icing sugar
4oz gluten free flour
2oz corn flour
1/4 tsp salt
1tsp xanthum gum
Finely grated peel 1 lemon

Beat together butter and sugar until light and creamy
Mix in the lemon then add the flour, corn flour, salt and gum mix until it comes together in a dough, wrap in clingfilm and chill for an hour. It is a very soft dough but does roll out fairly easily if you dust well with corn flour. Bake at 170/c until lightly golden on the edges ( check after 15 mins)

You can change the lemon peel for different flavourings like a tsp of vanilla or almond extract or even try orange peel. Enjoy!

Sunday 1 July 2012

For One Month ONLY!!!!!

Those of you who were around for Sale-a-bration may remember the GORGEOUS designer series paper collection Everyday Enchantment. It was one of my favourite paper collections ever. I love the modern vintage patterns,and fresh zesty colours, and so I was sad that I hadn't stocked up on more of it while I had the chance, so you can imagine my excitment when I heard that for the whole month of July we've not only been given a chance to stock up on more of the papers, but for every £45 you spend (before p&p) you can receive a FREE Everyday Enchantment Ribbon and Brad set.  So what does this kit contain I here you ask? Well there are 2 spools of 1/8" Organdy Ribbon in Lucky Limeade and Calypso Coral each spool has 10 yards of ribbon, plus there is a Brad Pack containing 30 brads 5 each of 5 designs. So as you can see the value for money is phenominal and it couldnt be easier to get your hands on all of these goodies, once you've put in your order for the papers (126154) for £9.95 the hardest part will be deciding what to pick from the 2011-2012 Catalogue or the Summer Mini to bring your order up to £45 then simply add your Ribbon and Brad (127279) collection for FREE!!!! Postage and packaging for any size order is £4.95 and will ensure your order is carefully and quickly delivered to your door by UPS.


There are some exciting bonuses on offer at the moment for Party Hostesses so if you would like to Hostess a Stampin' Up! party in your home, please drop me a line, I will be happy to come a share what I love with you and your friends :) Click here for more details.


Wednesday 27 June 2012

Sundae Special.

    Just a quick check in to say 'Yes! I am still alive.' My paper craft projects have been thin on the ground recently but I thought I'd share the card I made for my sister's birthday. A while back we were talking about ice cream as you do, Ben & Jerry's to be precise and she mentioned that her favourite flavour was Oatmeal Cookie Crunch. They only released it here for a limited time, and seeing as I'd just invested in an ice cream maker and the Ben & Jerry's recipe book(LUSH), I thought I'd give it a go for one of her birthday treats.

   To keep with the theme I changed up my Flower Pot Card and turned it into an Ice Cream Cone Card instead. I used the ScorePal to mark the waffle pattern on the cone and then cut out the ice cream balls with the 1 3/4 circle punch in Very Vanilla, Soft Suede and Pink Pirouette. The flake I cut out of Chocolate Chip with the Word Window punch then I put it through the crimper to give it texture. I would have liked to emboss the ice cream balls to make them stand out a bit more but once again I was crafting one handed with a whining child in the other arm!

Tuesday 1 May 2012

The Summer Mini Catalogue is HERE!

The Summer Mini Catalogue is here and choca-block with fabulous new stamp sets and must have products.

 Click here to have a look for yourself.

I can't wait to start creating new designs with the Framelits dies and the co-ordinating Apothecary Art stamp set has so many possibilities. I'm also really excited about the Simply Scored scoring tool, it is going to make scoring cards, boxes and rosettes a breeze, I can lie my card flat and make sure all the creases end up exactly where I want them. The twitterpated fabric and Designer Series Papers are a gorgeous colour combination with some really sweet ditzy designs, and what better way to celebrate the queens Jubilee this year then with a good ol' British Tea Party, decorated with the Tea Shoppe stamp set. I already have a class planned around the Blossom punch as I don't think you can ever have enough flower punches (or butterflies for that matter.) If any of these lovelies catch your eye, just drop me a line and I will be happy to order them for you.

6 places have already gone for my classes, but there are still 4 spaces left, I would love to have you there, email me today to reserve yourself a place.

P.S The Starter kit for New Demonstrators has changed and now it's even better value. I would love to have u join the StampinBerry team. Click here to find out more.

Thursday 26 April 2012

Spring Blossom Class

Isn't this time of year inspiring! Spring is my favourite time of the year there is such a sense of hope and anticipation in the air. To celebrate I have organised a whole class based on the beauty of spring and the fabulousness of the new "Blossom" punch that will be making its premier appearance in the Summer Mini Catalogue (out on the 1st of May!) There will be two classes. The first on Friday 11th May 7pm-9.30pm and the second is on Saturday 12th May 11am-1.30pm. There are only 5 spaces at each class so contact me soon to register! The class will cost £5.50 and will include all materials, light refreshments a door prize and you're own copy of the new mini catalogue. If you would like to have your very own Blossom punch to use at the class the price of the class will be £20. I will be teaching you 3 gorgous projects: A chic Thank You card, A Flower Pot card and A Petal Cone Die Favour Box. For more details or to book your place please don't hesitate to contact me.
P.s I've just discovered Instagram... Can you tell;)

Sunday 22 April 2012

A Quick Thank You.

I received my pre-order from the Summer Mini Catalogue this week and finally got to try a few of the bits out last night. You are going to LOVE what Stampin' Up! Have to offer this Summer. There are some really gorgeous 'Must have' products. The basic design for this card was a CASE from one I saw on Split Coast Stampers recently. I changed a few things to my own taste, but I really liked the way this card showcases the new Blossom Punch.(A person can never have too many flower punches!) Here I have punched the flower twice out of Poppy Parade card stock and layered it with the large flower from the Boho Blossoms Punch in Basic Black and a glittery black brad. The banner is cut from the Petal Cone Die, which I stamped with my message and trimmed down to fit behind the flower. I'm planning a workshop in the next few weeks so that you can come along and try out a few of these new exclusive Summer Mini Specials for yourself. and get a chance to look through the catalogue. I promise you, you won't be disappointed! Drop me a line if you'd be interested in attending. I'll be posting again soon with all the information.

Sunday 8 April 2012

Time Flys!

My Little One turned One this week. I can hardly get my head around just where this year has gone it literally feels like yesterday that we tentatively carried our tiny new bundle through the front door and now here she is strutting around the place winning us all over with just the smallest smile. So little time and yet my world has changed completely and forever. To mark this special landmark I decided to make her a cake. I love to bake but don't get the opportunity to do it so often these days. I decided on a Lemon drizzle sponge as that is my absolute favourite flavour in the spring and have noticed that Scrappy is partial to zesty flavours herself. I layered it with lemon cream cheese frosting and Lemon curd and yes, it was delicious if i do say so myself.
I had planned to sit and make her card the night before her birthday however Bubs had plans of her own and refused to go down to sleep so I ended up having to throw one together really quickly when she finally flaked out. I worked on the same theme as the tag that I made earlier in the week as I quite like how it turned out. I think the card could have done with a couple of pearls or sparkles, but considering it was a rush job I can't be overly critical :)
This last year has been the hardest and yet the most rewarding and most wonderful of my life. Who knows what this next year has in store for my precious little family.

Sunday 1 April 2012

Sunflowers in the Sunshine.

We have been enjoying a glorious week of sunshine. Seeing as this can be quite a rare event here in the UK, I have been spending as much time as I can topping up my Vitamin D levels, hence the lack of crafting but after my last order turned up I had to have a little play with some of my new things. I was most anticipating the arrival of my Two Tags Bigz Die (115954) I've seen some lovely projects made with these dies, they're so versatile: book marks, tags, party favours. I decided to go for a Spring themed bookmark and tried my hand at a sunflower using the daisy on the Blossom Party Originals Die from the Spring Mini I punched out a circle and embossed it with the Perfect Polka Dots Embossing Folder. The Butterfly is once again from the Beautiful Wings Embosslits, and I finished it off with Baja Breeze Seam Binding Ribbon and the stamped image in Certainly Celery is from the Forever Young Stamp Set.
  Snow is predicted for later in the month so I guess I'll have to make the most of this while it lasts.